
Today, I have a guest post for you from Melissa Shanhun.

Have you read been reading Stephanie’s Minimalist Scrapbooking challenge and wondered how you could make it work? I’ve been a card maker for about 10 years longer than I’ve been a scrapbooker, so I’m sharing with you how I’ve managed to keep my card making supplies in this chest of drawers.

Today I’m focusing on ways to use up paper scraps or sheets that have just been sitting around for way too long!
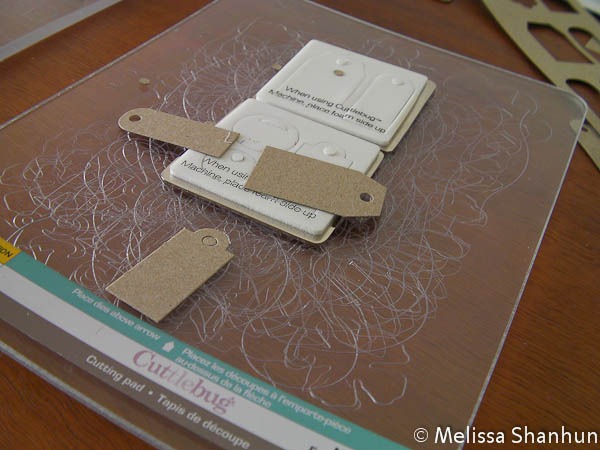
Die Cutting

I’ve been borrowing a friend’s Cuttlebug while she’s overseas. I know some people don’t recommend this, but I love the idea of my boring old scraps being cut and embossed into fun shapes. Even some packaging cardboard looks adorable cut with the 2 inch tag dies.
Emboss
You can heat emboss, dry emboss or use a embossing folder to create some texture on your paper. Stamp or paintbrush pigment ink or Versa Mark onto patterned paper and give it a bit of dimension. I own only clear embossing powder – so use it with coloured ink to introduce a bit of variety to my embossing.

An afternoon with the Cuttlebug dies and embossing folders gave new life to my scraps!

Glitter
I know that scrapbookers often have a drawerful of stickles, so why not use them to dress up your older papers. Adding some glitz to older style paper works a treat.

Don’t have stickles? A glue pen and fine glitter works a treat.

Punch
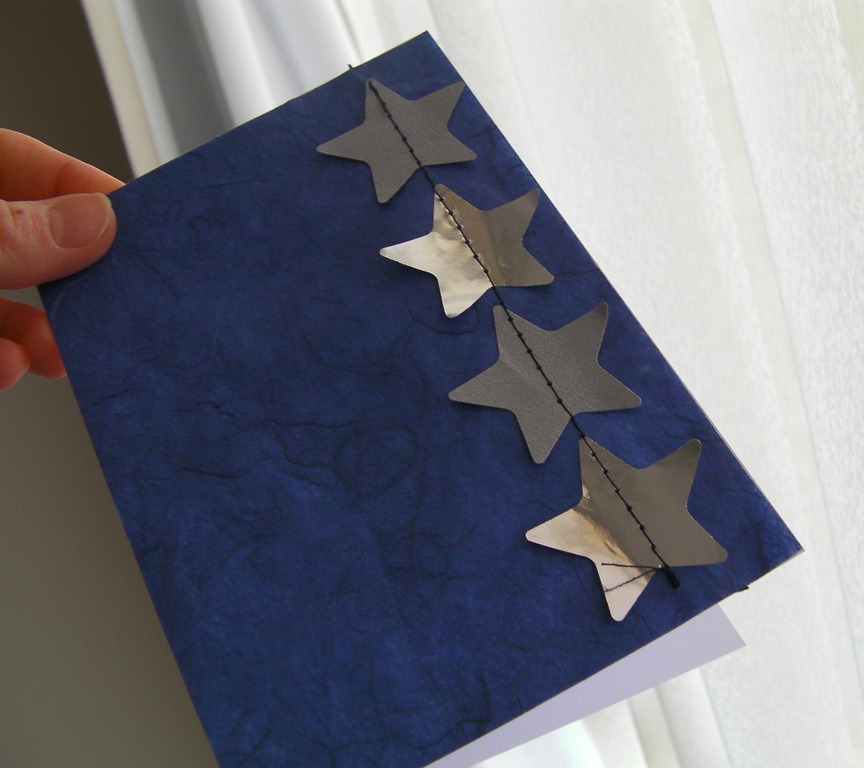
I just punched two types of silver paper that i has laying around and sewed them to a mulberry paper background to create this simple card. I love that I can mass produce a card and just vary the punch and papers for a whole new look.
ScrappyJedi has more awesome uses for punches and scraps in her punched garlands and embellishment stickers post.
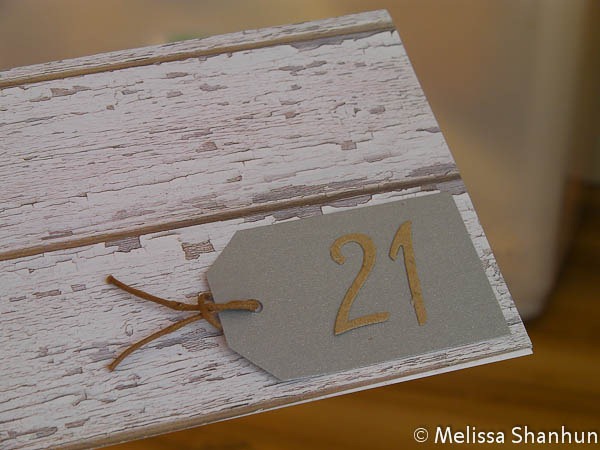
Cut

I used my craft knife to cut out patterns from some vellum I’d never used, due to the all over pattern. I just added a couple of bits to ivory cardstock and embossed some numbers as the sentiment.
Alter

With a few years of crafting (and hoarding supplies – did I mention I collected stickers and Easter egg wrappers as a child) under my belt, I quite a few old art supply style items that aren’t really in fashion any more. In this card for my daughter’s first birthday I tool the red art stock paper and black leather style papers from the backs of spiral bound reports.

I just traced and cut out the Scottie dogs and number 2 then drew some white stitching on to make it a big more special. Emily’s birthday card was a hit!

In my rosettes video below, I show a quick way to modify a Christmas themed flower set – simply rip it up! You may choose to paint over greetings or use the B side of patterned paper. Get creative to use up your seasonal supplies.
Make rosettes and banners

If you fancy using up some strips of old paper, rosettes may become a favourite of yours.
For a rosette you can just get a long strip of paper offcut, and then fold them every 3-4mm. then just tape 2-3 together – see my video tutorial for more details.


The simplest banner can be made by ruling diagonal lines onto a paper strip, then snipping off triangles, drawing in your string (or use real twine to dig into your stash further!) and sticking them to your page, as ScrappyJedi does here.
Make paper flowers


I used Kelleigh Ratzlaff’s paper flower tutorial to create all of these paper flowers – I just drew the flower shapes by hand. I was stunned when they came out looking this good!

For the leaves I just cut a pointed oval out of vellum and folded a centre line to make them three dimensional.
The other embellishments were handmade too – I just tied a bow and repurpose a bit of packaging bling!
Use a production line to get more done

So how does this help you use your stash? I simply use more of it up if I make more cards at once, rather than just making a card with the latest thing I bought. Here’s my basic process:
- Gather your tools, ie paper trimmer, craft knife, glue.
- Cut and prefold excess card stock. I usually do about four times as much as I plan on using at one sitting.
- Use your scraps to create a couple of standard embellishments
- Do any stamping and let it dry
- Assemble the cards.
I used a production line for my Peter Rabbit cards above. I couldn’t resist the felt stickers, so I used some plain paper, my scissors and corner rounder to complete these cards. I have left some space to add a sentiment for a few of the cards.

I did a few cards for Christmas a couple of weeks ago using this method. For my Christmas in July crafting party I created just two card designs and prepared 15 sets of card making supplies.
I love Lain’s idea for making 4 cards in 20 minutes and her tips for cardmaking here.
I hope you are feeling inspired to go to work on your stash – why not link me up to your latest stash-busting creation?
Melissa
Melissa Shanhun is a scrapbooking educator, specialising in live online and in-person training. She loves scrapbooking and shares her passion through inspiration and training.
PS Looking for more inspiration? Scrapworthy Lives readers will receive complimentary access to my recent Photo Fixes for Real People online workshop here.

 Stephanie Medley-Rath is a sociologist and scrapbooker who studies scrapbooking and memory keeping. Scrapworthy Lives is a blog focused on her sociological analysis of scrapbooking, with a sprinkling of posts about Stephanie's own scrapbooking projects.

4 Responses to How to Use Up Paper Scraps from Melissa Shanhun